nagiosと互換性のある監視ツールにicinga2というツールがあります。
従来まで、canned-catfood gamingではサーバーの監視ツールにこのnagiosを使用していましたが、より優れたUIを持つ監視ツールを探していました。
nagiosの良い点はコミュニティによって維持されているpluginが豊富かつ、これらのpluginが非常に有用だった点です。
一方でモバイルでの閲覧や、グラフ描画との親和性、監視導入の手間(導入側のみでなく、管理側でも設定が必要)など
後発の製品に劣る部分も少なからずありました。
これらのpluginについて互換性を残しつつ、機能を拡張した監視ツールとしては、下記の2点がよく知られています。
・Sensu(https://sensu.io/)
・Icinga(https://www.icinga.com/)
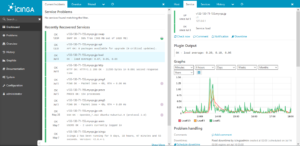
今回は、後者のIcingaにグラフ描画ツールGraphiteをIntegrationしていきます。
完成すると下記のような画面が表示できるようになります。
環境:
Ubuntu server 16.04.3 LTS
Mysql server
1. Graphiteのインストール
Graphiteを導入する前に全体のupdateとupgradeを掛けます。
sudo apt-get update -y
sudo apt-get upgrade -y
GraphiteはUbuntuのcanonicalレポジトリに存在しているので、レポジトリから導入します。
sudo apt-get install graphite-web graphite-carbon mysql-server python-mysqldb python-pymysql apache2 libapache2-mod-wsgi
2. 設定の変更・MySQLとの連携
MySQLのデータベース上にgraphiteで使用するデータベースを作成します。
$mysql -u root -p
Enter password:
Welcome to the MySQL monitor.  Commands end with ; or \g.
Your MySQL connection id is 476483
Server version: 5.7.22-0ubuntu0.16.04.1 (Ubuntu)

Copyright (c) 2000, 2018, Oracle and/or its affiliates. All rights reserved.

Oracle is a registered trademark of Oracle Corporation and/or its
affiliates. Other names may be trademarks of their respective
owners.

Type 'help;' or '\h' for help. Type '\c' to clear the current input statement.
mysql> create database graphite;
Query OK, 1 row affected (0.14 sec)

mysql> grant all on graphite.* to graphite@localhost identified by 'password';
Query OK, 0 rows affected, 1 warning (0.45 sec)

mysql> exit;
graphiteの設定ファイルを書き換えます。
Ubuntu 16.04 LTSの場合、下記のディレクトリに作成されます。
/etc/graphite/local_settings.py
# Set this to a long, random unique string to use as a secret key for this
# install. This key is used for salting of hashes used in auth tokens,
# CRSF middleware, cookie storage, etc. This should be set identically among
# instances if used behind a load balancer.
SECRET_KEY = 'UNSAFE_DEFAULT'

# Set your local timezone (Django's default is America/Chicago)
# If your graphs appear to be offset by a couple hours then this probably
# needs to be explicitly set to your local timezone.
TIME_ZONE = 'Japan/Tokyo'

DATABASES = {
    'default': {
        'NAME': '/var/lib/graphite/graphite.db',
        'ENGINE': 'django.db.backends.mysql',
        'USER': 'graphite',
        'PASSWORD': 'password',
        'HOST': 'localhost',
        'PORT': '3306',
        'STORAGE_ENGINE': 'INNODB'
    }
}
SECRET_KEY、TIME_ZONE及びDATABASESを環境に合わせて編集します。
3.Carbon-Cache 設定と有効化
icinga2のデータをgraphite上に保管するに当たって、データの保存期間等を設定していきます。
設定は通常、/etc/carbon/storage-schema.conf に保存されています。
# Schema definitions for Whisper files. Entries are scanned in order,
# and first match wins. This file is scanned for changes every 60 seconds.
#
#  [name]
#  pattern = regex
#  retentions = timePerPoint:timeToStore, timePerPoint:timeToStore, ...

# Carbon's internal metrics. This entry should match what is specified in
# CARBON_METRIC_PREFIX and CARBON_METRIC_INTERVAL settings
[statusengine]
pattern = ^statusengine\.
retentions = 60s:90d

[carbon]
pattern = ^carbon\.
retentions = 60s:90d

[default_1min_for_1day]
pattern = .*
retentions = 60s:1d
systemdのサービスとして、起動時に起動するように設定し、サービスを開始します。
sudo systemctl enable carbon-cache
sudo systemctl start carbon-cache
また、Apache上でアクセス可能なように設定を有効化します。
sudo a2ensite apache2-graphite
sudo systemctl reload apache2
4.Icinga2でのGraphiteモジュールの有効化
コマンドラインから下記を実行して、icinga2上のGraphiteモジュールを有効化します。
sudo icinga2 feature enable graphite
icinga2側の設定を変更します。
設定ファイルはUbuntu 16.04の場合、/etc/icinga2/features-available/graphite.conf に存在しています。
/etc/icinga2/features-available/graphite.conf
library "perfdata"

object GraphiteWriter "graphite" {
  host = "127.0.0.1"
  port = 2003
  enable_send_thresholds = true
}
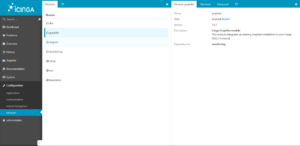
Icinga2の管理画面上からgraphiteのモジュールを有効化します。
Configuration -> Module -> Graphite を選択し、”Enable”に設定します。